
Google Ad Manager serves the majority of display and video impressions across professional publishing, yet most accounts still run with default line item settings and a flat price floor. The gap between a default GAM setup and a tuned one typically shows up as a 20 to 40 percent difference in effective CPM on the same traffic. We manage GAM accounts alongside our own supply-side platform every day, and the seven strategies below reflect the changes that consistently produce that gap. Each one includes the actual setup steps and the metrics you should watch before and after. None of them requires new traffic, new content, or a redesign, only configuration work inside GAM and a measurement routine around it.
1. Rebuild Your Inventory Structure Around One Ad Unit Per Placement
Most legacy GAM accounts carry duplicate ad units for the same slot, a habit left over from old direct campaigns and manual trafficking. Duplicates fragment your reporting, break frequency controls, and force the ad server to split demand across codes that should compete as one. The fix is a consolidation pass, and it is the least glamorous item on this list but the one that makes every later strategy measurable.
Start with an inventory export from the Admin section. Map every ad unit currently in production to the physical placement it serves, then pick one canonical code per placement. Create a new clean hierarchy if the old one carries years of dead codes, because GAM lets you archive, not delete, and a fresh tree keeps reports readable. Update your GPT tags, your Prebid configuration, and your ads.txt file so the canonical codes appear consistently everywhere. Check sellers.json as well if you transact through MCM, because mismatched codes between your ads.txt and your upstream partner declarations cause bid rejections that look like demand loss but are actually a declaration problem.
The measurement here is simple: track unique ad units per placement, and confirm that impression counts per unit match your analytics page views times slots. After consolidation, watch bid density. When all demand competes inside one ad unit, the auction has more bidders per impression, and GAM's reporting finally shows the true fill rate per placement rather than a split picture. Expect a few weeks of transition where historical comparisons break, so export your pre-change reports first. Publishers who skip this step end up diagnosing every later problem twice, once per duplicate code.
2. Run Header Bidding Through Prebid and Connect Server-Side Demand
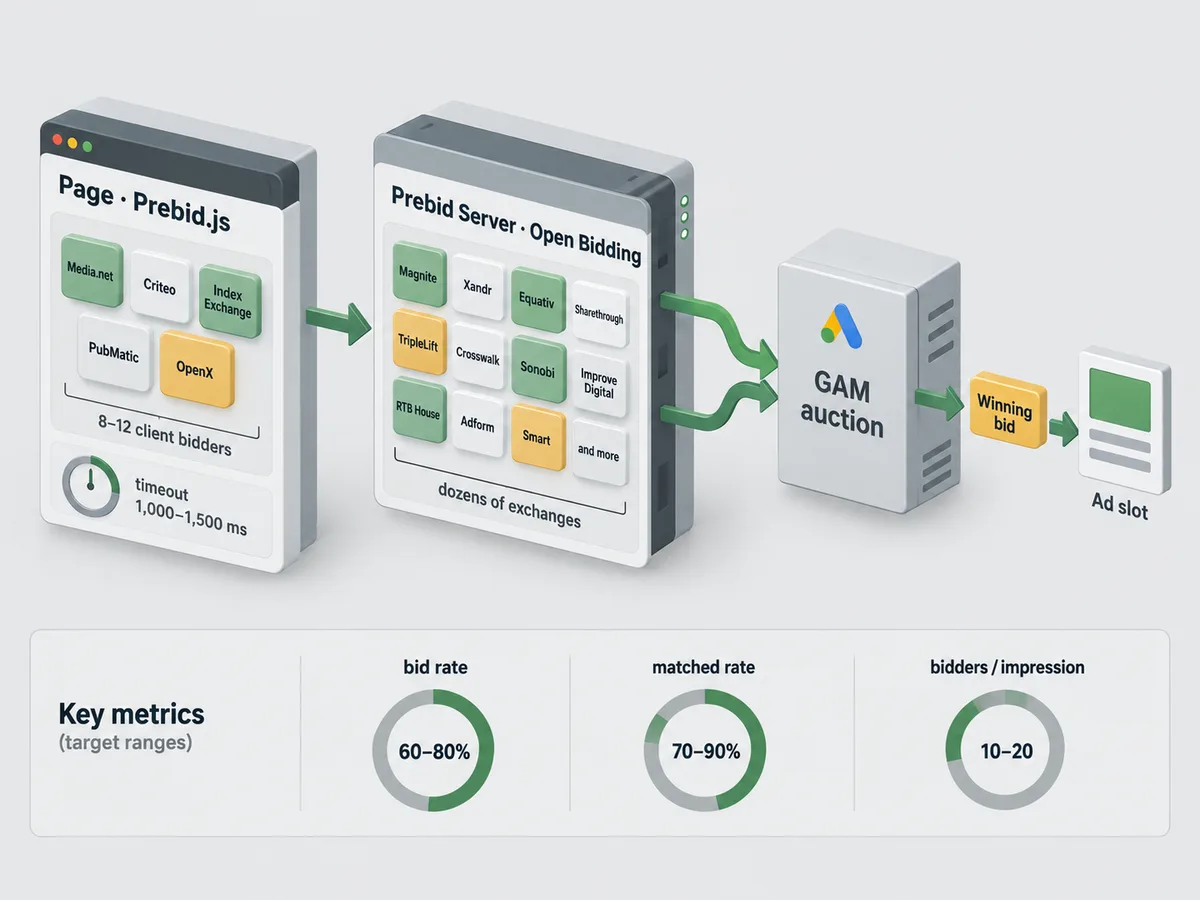
Client-side header bidding through Prebid.js remains the base layer for most publishers, but the ceiling on client-side demand sits at roughly 8 to 12 bidders before latency and timeout losses eat the gains. The advanced configuration pairs Prebid.js with server-to-server demand so you can add dozens of exchanges without adding browser requests. Google's own Open Bidding follows the same pattern: contract and configuration tasks precede server-to-server Open Bidding, and each authorized bidder then connects through Google's infrastructure rather than your page. You can read Google's guidance on getting started with Open Bidding before you commit to the integration path.
On the client side, keep the Prebid timeout between 1,000 and 1,500 ms, load the library asynchronously, and place the request before the GPT render call so bids arrive before GAM auctions the impression. Configure the bidder timeout per device class, because mobile connections need more headroom than desktop. On the server side, connect additional demand through a server-side wrapper. We run header bidding with WireAds as our connected partner, and our SSP platform combines Prebid, OpenRTB, Google MCM and AdX demand plus direct agency deals into one auction layer, so publishers gain server-side scale without managing each exchange relationship themselves.
Measure three numbers weekly: bid rate (the share of impressions that receive at least one bid), matched rate, and the average number of bidders per impression. If bid rate climbs but revenue does not, your timeout is cutting off slower bidders. If latency metrics in Core Web Vitals regress after adding server-side partners, raise the client-side timeout slightly and let the server handle the long tail, because server-side bids do not touch the browser. Also compare the eCPM of client-side bidders against server-side bidders on the same placements each month, and migrate the ones that consistently clear higher prices on the server, where they no longer cost you page speed.
3. Turn First-Party Data Into Targetable Key-Values
First-party data is the clearest revenue lever left after cookie deprecation, and GAM targets it through key-values. Most publishers pass one or two keys, such as page category, and stop there. The advanced setup passes a structured set of targeting keys on every impression: content category, article depth (introductory versus deep-dive), user type (new versus returning subscriber), and session intent signals such as on-site search terms.
Implement this in your GPT tag with setTargeting calls, and validate the keys in GAM's forecasting and delivery reports before you sell against them. Keep the key list short and stable, because every key adds auction complexity, and buyers only pay for segments they can verify and reach at scale. Once keys flow reliably, build audience segments in GAM under the Audiences tab, then package those segments into your direct deals and proposals. Advertisers pay a premium for segments they can verify, and your sales team can quote segment reach with GAM's forecasting tools instead of guessing.
The measurement discipline matters more than the number of keys. Pull a key-value delivery report and compare eCPM by segment against untargeted impressions. A returning-subscriber segment should clear measurably higher CPMs than anonymous traffic, and if it does not, the key is either wrong or too broad. Check key coverage too: if fewer than 80 percent of impressions carry a given key, fix the tagging before you promise the segment to a buyer, because underdelivery on a data-targeted deal damages the relationship more than a lower rate would. Revisit the segment definitions quarterly, since content mix and audience behavior shift, and a segment that stopped differentiating still shows up in reports as a cost.
4. Sell Premium Access With Preferred Deals and First Look
Open auction revenue responds to auction mechanics, but the larger CPM jumps come from selling access before the auction. GAM supports this in two layers. A Preferred Deal gives one advertiser negotiated fixed-price access to specific inventory before the open auction runs, which suits sponsorships and high-visibility placements. First Look pricing rules go further: they give select advertisers or demand partners the right to buy before the open auction at a set price, and Google documents the First Look pricing rules setup in the pricing rules interface. For the fixed-price tier, the Preferred Deals overview covers the negotiation and activation flow.
The setup sequence is: define the inventory package, agree the price and volume with the buyer, create the deal in GAM, and let the buyer accept it in their interface. For First Look, apply the rule at the ad unit or placement level and scope it narrowly, because a First Look rule applied to all inventory effectively becomes a floor for the whole site. Sequence the two layers deliberately: Preferred Deals for guaranteed sponsorships, First Look for chosen demand partners you want to reward with early access at a price you set.
Measure the cannibalization honestly. Pull a report of impressions won by the deal versus the open auction eCPM on the same inventory in a prior period. A good Preferred Deal beats the blended open auction CPM on that placement by a clear margin, typically 30 percent or more, and it also stabilizes revenue month to month. If the deal price sits below what the open auction pays, renegotiate or let it lapse, because a below-market deal does not just underperform, it actively removes your best impressions from the auction. Review every pre-auction arrangement at renewal time with this same report, since auction prices move and a deal that made sense at signing can quietly become a subsidy to the buyer.
5. Set Unified Price Floors Instead of Per-Ad-Unit Minimums
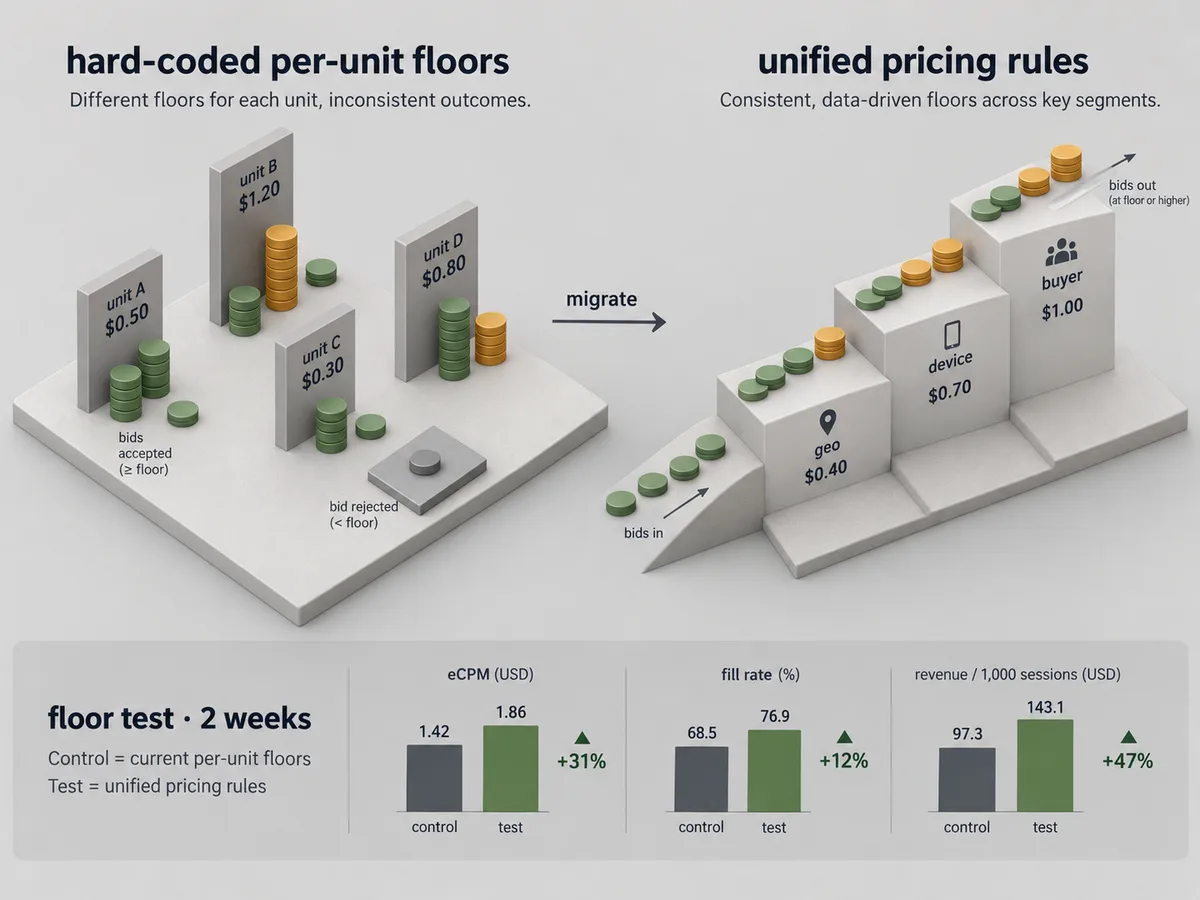
Legacy accounts often carry hard-coded minimum CPMs on individual ad units, set years ago and never revisited. Hard floors block demand that would have paid slightly less, and GAM then serves a blank or house ad where a paying impression existed. The modern approach uses unified pricing rules, which set a floor per buyer or per inventory segment and let the auction resolve the rest.
Build the rules from data, not instinct. Export 30 days of auction-level data, either from GAM's price granularity reports or from your bid stream, and calculate the win rate and clearing price by floor value. GAM's unified pricing rules then let you set floors by buyer type, so you can hold direct and private demand to a higher floor while leaving open auction demand freer to clear. Set the price granularity to a detailed level (one-cent increments) during the analysis period, because coarse buckets hide the exact clearing point. Document every floor change in a shared log, because in six months you will need to know why a number moved.
Measure with a floor test grid: change floors on a subset of ad units, hold a control group steady, and compare eCPM, fill rate, and revenue per thousand sessions across both groups over at least two weeks. Floors that are too high show up as fill rate loss that outweighs the CPM gain; floors that are too low show up as high fill with stagnant eCPM. Re-run this quarterly, because clearing prices move with seasonality and demand shifts. Publishers who connect our demand through MCM often see the auction pressure itself push clearing prices up, which then lets you raise floors without sacrificing fill. Treat floors as a dial you turn with data, not a setting you set once.
6. Engineer Viewability With Lazy Loading and Refresh Policies
Advertisers buy viewable impressions, and GAM's Active View metrics price that reality into your bids. Two viewability levers sit fully under your control: when the slot loads, and whether it refreshes. Lazy loading defers the ad request until the slot approaches the viewport, which cuts wasted impressions on long pages and concentrates your traffic into impressions with genuine view potential. In Prebid.js this means configuring the lazyLoad option in GPT with a sensible fetch and render margin, typically 400 to 800 pixels, rather than loading every slot on page load.
Refresh policies replace the creative after a set interval, commonly 30 to 60 seconds, only while the slot stays in view. GAM supports this through refresh logic in your GPT setup, and the key rule is to refresh only when the slot has an Active View eligible impression, which protects your viewability rate and keeps buyers willing to bid on the refreshed slot. Cap the refresh count per slot as well, because impressions four and five deep into a session rarely clear meaningful prices and they dilute your placement-level viewability average.
Measure Active View viewability per placement, per device, and per refresh cycle. A refresh interval that is too short shows up as viewability decay on cycles two and three, and buyers respond by discounting those impressions. Track the eCPM of refreshed impressions separately from first-load impressions in your reporting, because a healthy refresh program adds revenue without dragging the blended metrics down. Also watch total revenue per session rather than impressions per session: lazy loading reduces impression counts by design, so the correct success metric is session-level revenue, which typically rises when wasted below-the-fold requests stop competing for demand.
7. Audit Performance With Revenue Analytics and Forecasting
None of the six strategies above holds its value without measurement, and GAM gives you the raw material for a real audit: delivery reports, historical query tool exports, auction insights, and the change history log. The discipline that separates advanced operators is a fixed reporting cadence. Review daily delivery anomalies, weekly eCPM and fill by placement, and monthly trends by demand source, buyer type, geo, and device.
Structure the audit around a few standing questions. Which placements earn the most per session, and which carry the site with volume? Where does fill rate drop, and does the drop track a floor change, a demand partner outage, or a seasonality pattern? Which line items underdeliver, and do the makegoods cost more than the deal is worth? GAM's historical reports answer most of this directly, and the change history log tells you whether a revenue dip followed a configuration change or arrived on its own. When you layer our revenue analytics on top of GAM's native reports, you get per-demand-source breakdowns across our connected exchanges and direct deals, which makes the audit faster and keeps attribution honest.
Forecasting closes the loop. Use GAM's forecast tool before every direct commitment, and re-forecast mid-flight on deals that pace behind. The advanced move is to forecast against your key-value segments, not just raw inventory, because a deal targeted to a premium segment has a much smaller reachable pool than the placement-level numbers suggest. Publishers who forecast by segment and hold inventory accordingly underdeliver less, renegotiate earlier, and preserve the open auction revenue that overcommitted deals would have cannibalized.
Where to Start
Run these seven in order of revenue impact for your specific account. For most publishers the sequence is: consolidate inventory, fix floors with a test grid, then layer data targeting and pre-auction deals once the auction itself is clean. Each strategy is a configuration change inside GAM plus a measurement routine around it, and each one compounds the others: unified floors make header bidding results readable, clean inventory makes data targeting deliverable, and viewability engineering raises the prices that all of the above can command. Set a baseline before you touch anything, change one variable at a time, and let two weeks of data confirm each step before the next.